|
|
|
Biography
 Stickys' Stupiditys' Tagboard
Archives
February 2010 December 2010 January 2011 February 2011 March 2011 April 2011 May 2011 June 2011 Lnks
AuditionSEA
Eddie
jiaqi
Mavis
Shanice
Class blog
|
Friday, February 11, 2011 P A R T FIVE In part five we're going to learn:
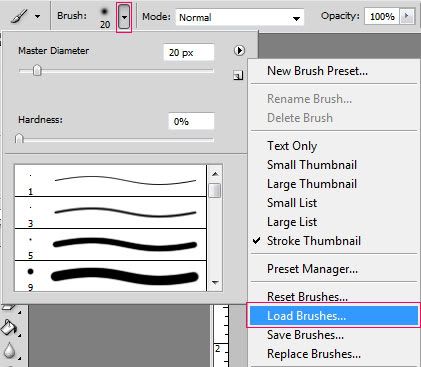
Brushes, brushes, brushes. I'm almost a little afraid to write out this part of the tutorial because really, a lot of people tend to overuse/abuse brushes and drown their graphics. Brushes are even more risque than textures @___@ But because I'm wonderful and well, sometimes it's fun to choke your graphics, I'm going to teach you about brushes. First of all, what are brushes? They're not really like brushes as you would imagine unless you're using a tablet and doing paintings/etc, but that's a different story. Brushes in graphic blending is more like stamps. You can stamp on different things to your graphics to make them more interesting. Brushes can be anything, text art, scribbles, grungy stains, even coffee stains. ANYTHING. Truly! Google photoshop brushes if you need to. Here are some of the brushes that I've MADE, they belong to me entirely so DO NOT claim them as your own. Feel free to download them though to help you follow along with the tutorial. Feel free to choose from these. Brushes Here After downloading the brushes, unzip the zip file using the zipper program (download 7zip if you want to use a free one). The brushes are now in .abr format, the brush format for photoshop. Click the brush icon on your tool bar. Then where you see your current brush on the top, click the down button, then click the little arrow on the right that points to the left, there should be a drop down menu. Choose load brushes.  Find where you saved the brushes in .abr format and select it and click ok. Your new brushes should now be available for you to use when you click the down arrow next to the current brush. To use your brushes, click the brush and then click over your canvas to use it. You can also adjust the colors of your brush. Don't forget that if you use your brushes on a separate layer, you can adjust the layer style. Here's what I did with my lines brushes. The cyan colored lines was my brush, I put it on a separate layer with the layer style overlay.  C U S T O M B R U S H E S Now I'm sure that you're all curious about how I made my own brushes right? Well it's really very simple. Some of my brushes I drew on paper, and then scanned in, others were made in photoshop. The concept is the same. Open up a blank canvas, I'm going to make it 200x200 pixels with a transparent background. Make sure the color is on black. Now with my mouse, I'm going to select a default circular brush (Oh, if you ever want the default brushes back, just go back to the menu with the load brushes and click reset brushes and replace). I chose a 19px round brush and I made a heart with it. It's ugly but that's not the point C: In your toolbar, find your rectangular marquee tool and make a selection around what you want to be your brush.  On the top go to Edit > Define Brush Preset and name it! Voila your new brush that you created is now ready for use! To save a bunch of your brushes, go to the load brushes menu and click save brushes, this will save all of your brushes in that selection. C U S T O M I Z A T I O N Lastly, is the most powerful tool of photoshop CS2 versions and higher. The brush customization palette. Get your default brushes and select a 3px round hard round brush. On your right near the top, there should be a little button that looks like a menu, if you click it the brush panel will pop up. Or you can press f5 on your keyboard. Once it's open, click brush tip shape, and you should be greeted with different options. Find spacing near the bottom and move the percentage to 341%. Save the new brush by clicking the little paper icon near the bottom by the garbage can. Name it and you can now use it. How is this brush cool? Try it out! When you use it, it makes little dots instead of a line. Feel free to play around with ANY of the settings within the brush customization panel, who knows what kind of cool brushes you'll be able to create?!  ! Maybe later on I'll go into more detail about this panel in another tutorial. ! Maybe later on I'll go into more detail about this panel in another tutorial.That's all for now! Go ahead and play around with your brushes, but remember....try not to overkill. This is the end of Part Five. ♥ Labels: Signature Guide |